Mesh Animator Documentation
Looking for version 1.x documentation? View it here!
Upgrading to version 2.x from 1.x
Version 2.0 of Mesh Animator introduced sweeping changes that may not be compatible with previous versions. It is recommended to delete the existing MeshAnimator folder from the project, import the new package, and then re-bake any previously baked assets.
Unity version support
Version 2.0 dropped support for older Unity versions and is being built for Unity 2018.3+. If example asset meshes look stretched or corrupt, it's most likely just a version difference issue. Rebake the included example prefabs. Snapshot mode may still work with older Unity versions, but it will not be officially supported.
Overview
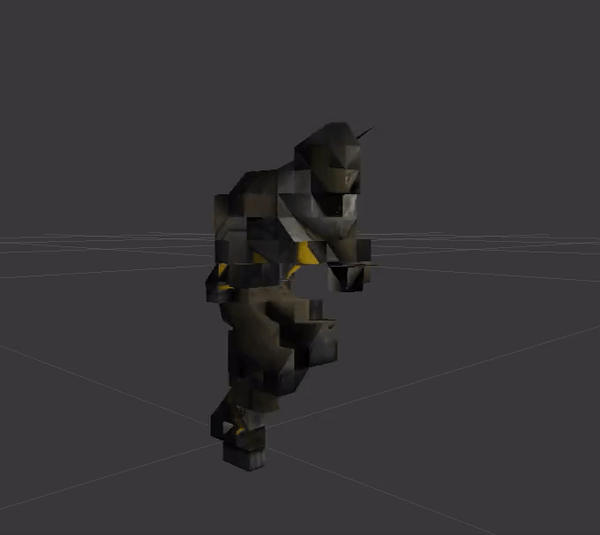
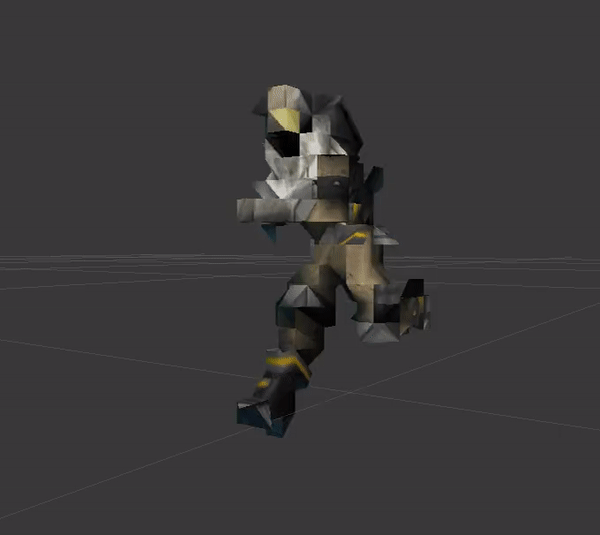
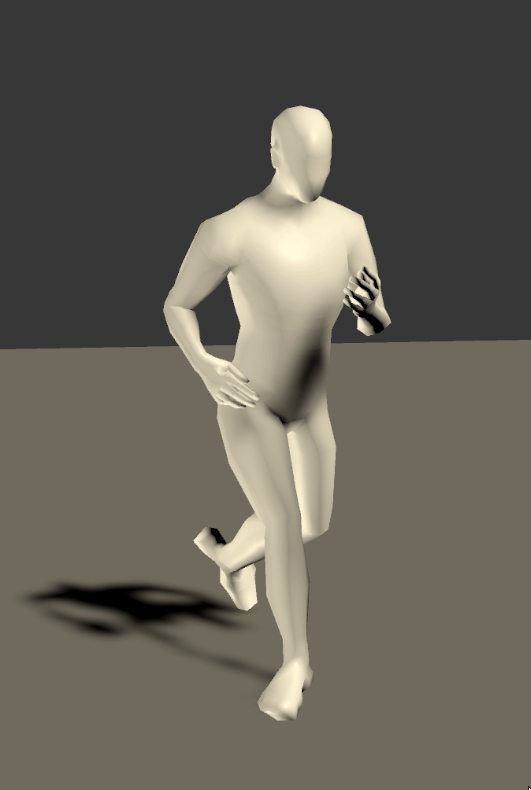
Mesh Animator is a toolset for converting and fully animating characters, animated assets, or any other kind of skinned mesh.
Find resources below on how to use Mesh Animator and all it's features. To report any bugs, or for questions not covered in the documentation, please e-mail jschieck@gmail.com.
Topics
- Frequently Asked Questions
- Getting Started
- Bake Window
- Using Mesh Animator
- Snapshot Mode
- Shader Mode
- Example State Machine
Frequently Asked Questions
- Example meshes look stretched and distorted
- The asset is currently being built in Unity 2018.3. In new versions of Unity, vertex ordering was changed so the baked data included with the asset does not appear correctly. Simply rebake the example assets in the MeshAnimator/Examples/Meshes folder to fix the issue.
- Are Mecanim blend trees/avatar masks supported
- Since bone information is lost, it's not possible to combine multiple animations together other than a simple crossfade.
- Does Mesh Animator support ragdoll
- Short answer no. All bone information is lost during the baking process. One way around this is to swap the prefab when ragdoll is needed to a full, non Mesh Animator version of the prefab.
- Does Mesh Animator support IK hands/feet
- No. All bone information is lost during the baking process.
- Does Mesh Animator support LOD (level of detail) levels
- Yes! Use the included LOD feature to animate further away meshes less often, as well as Unity's LOD Group component to display less/more complex prefabs at a specified distance.
- Does Mesh Animator support URP, HDRP, or Shader Graph?
- Snapshot Mode Any shader or render pipeline can be used with snapshot mode.
- URP Shader Mode Included with the asset are converted versions of the URP default shaders. See Universal Render Pipeline.
- HDRP Shader Mode Default shaders have not yet been converted, but can be used with shader graph shaders. See High Definition Render Pipeline.
- Shader Graph Included with the asset is a Mesh Animator Sub Graph that can be used to implement animated meshes into shader graphs. See Shader Graph.
- Snapshot Mode Meshes are rotated incorrectly until starting Play mode
- This is due to the mesh pivot not having zeroed out rotations. SkinnedMeshRenderers correct this by using skin weights. When the animation is baked, that skinning information is lost and the mesh displays as it's imported until starting playback. Fix the mesh pivot information in a 3D package to correct this.
- Snapshot Mode There are lots of meshes showing in the Memory profiler even though instances have been removed
- All generated animation frames are kept in memory until the last instance of the base mesh is removed. At that point all animation frames are also destroyed.
- Shader Mode No animations are playing
- Ensure all materials have been swapped to use an included Mesh Animator shader, or one that has been converted to be compatible.
- Snapshot Mode Meshes are disappearing in the Editor when I enter play mode
-
Unity introduced the ability to skip scene and script reloading in the Editor for faster development. However this breaks Mesh Animator as it uses static dictionaries for performance. You can disable this feature in the Project Settings menu, under the Editor tab.

-
Unity introduced the ability to skip scene and script reloading in the Editor for faster development. However this breaks Mesh Animator as it uses static dictionaries for performance. You can disable this feature in the Project Settings menu, under the Editor tab.
Getting Started
- Import the Mesh Animator .unitypackage from the Asset Store
-
Navigate to Assets/Create/Mesh Animator
- Doing so with an asset selected will auto-populate the asset in the bake window.
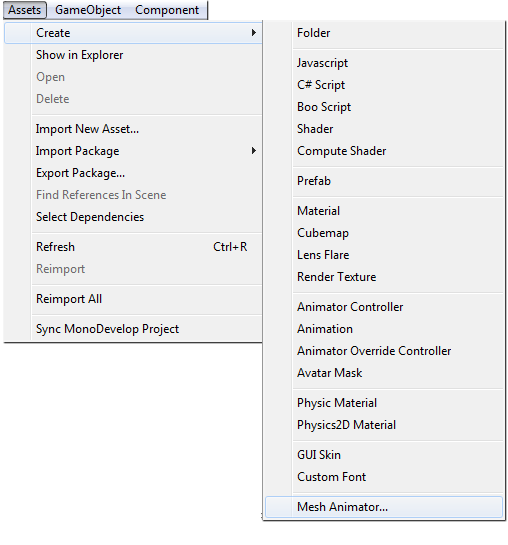
-
The following window will appear
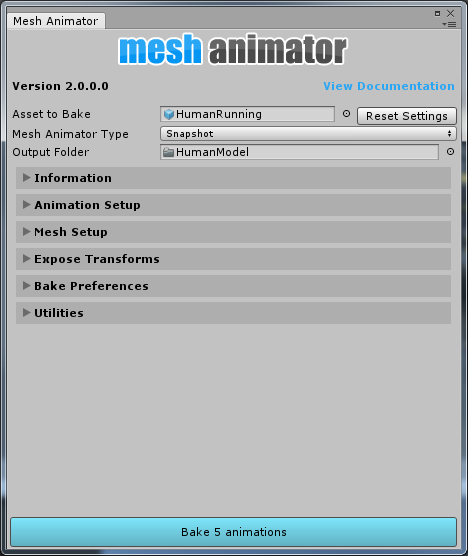
Mesh Animator Bake Window
- Asset to Bake - The parent object to bake. This must link to an asset in the project with an Animator or Animation component.
-
Mesh Animator Type
-
Snapshot Mode
-
The classic Mesh Animator implementation. It functions by baking the vertex positions of meshes throughout animations then swaps them out at runtime. It improves performance by removing the complex math required for skinned mesh rendering, freeing up the CPU to do other work, but requires more memory.
- Creates a copy of the mesh in memory at runtime for each frame of animation.
- Requires more memory than a traditional SkinnedMeshRenderer, but CPU usage is much lower and more meshes can be displayed.
- Does not require special shaders, and is compatible with all platforms and graphics devices.
- Supports GPU instancing for identical meshes currently on the same frame of animation.
- Compatible with all render pipelines.
-
The classic Mesh Animator implementation. It functions by baking the vertex positions of meshes throughout animations then swaps them out at runtime. It improves performance by removing the complex math required for skinned mesh rendering, freeing up the CPU to do other work, but requires more memory.
-
Shader Mode
-
Shader mode was introduced in version 2.0 and works similarly to Snapshot mode, except it stores vertex positions as a texture. Custom shaders then move the vertex positions of the meshes on the GPU. This provides a higher level of performance since the GPU is doing the heavy work, and uses less memory since only one mesh copy is needed.
- Creates textures that store animation data for each animation frame.
- Requires special shader code to update the mesh vertex positions.
- Requires 2D texture array support by the graphics device, and may not be compatible with older graphics hardware.
- Supports GPU instancing and provides the highest level of performance.
-
Shader mode was introduced in version 2.0 and works similarly to Snapshot mode, except it stores vertex positions as a texture. Custom shaders then move the vertex positions of the meshes on the GPU. This provides a higher level of performance since the GPU is doing the heavy work, and uses less memory since only one mesh copy is needed.
-
Snapshot Mode
Information Section
This section provides general information about the currently selected bake mode.
Animation Setup
Setup which animations will be baked.
- Animation Controller - Supply an animation controller to auto-populate all clips used in the controller.
- Avatar - If baking a humanoid prefab, this option will appear. Designate the avatar used by the asset.
- Root Motion Mode - If baking a humanoid prefab, this option will appear. It can be used to apply root motion to the mesh or transform.
-
Bake Animations
- Add Custom Animation Clip - Add custom animation clips to bake, helpful for baking on prefabs or objects where the animations aren't automatically detected.
- Add Selected Animation Clips - Adds all currently selected animations to be baked.
- Snapshot Mode Only Global Frame Skip - Instead of baking animation every X frames, animations can be baked by skipping frames and then skipped frames are smoothly interpolated at runtime. This significantly reduces asset sizes but can result in poor animation quality.
- Snapshot Mode Only Per Animation Frame Skips - Individual animations can skip frames during baking.
Mesh Setup
Setup meshes to be baked. All meshes will be combined into a single mesh and lose bone skinning information as part of the baking process.
- Mesh Filters - Add MeshFilters that should be baked.
- Skinned Mesh Renderers - Add SkinnedMeshRenderers that should be baked.
- Use Original Mesh - If baking a single mesh filter, optionally use the original mesh, instead of baking a new one.
Expose Transforms
The baking process removes all bones and transforms from the prefab or asset. To attach an object, for instance, attach a sword to a hand bone. Expose the transform and it will move with the animation. This adds a slight amount of overhead as it needs to update each transform position each time the animation frame changes.
Bake Preferences
Bake settings to control accuracy and asset size.
- Bake FPS - The sample rate at which the bake will happen. Bakes a frame every X frames. A higher rate means more accurate and smoother animation, but bigger asset sizes.
-
- Fast Normal Calculation - Use Unity's RecalculateNormals() method or a more complex method of recalculating normal angles.
- Custom Compression - Turn on this option to enable custom compression.
-
Compression Accuracy - Determines how many floating point numbers to store for vertex positions. When using Custom Compression, the lower the number, the more compression and less accuracy will occur.
Accuracy = 0.001. Good for most animations. Use 0.0001 for even less compression.
Accuracy = 0.01. Good for larger models or models not viewed close up.
Accuracy = 0.1. A very low accuracy can be used to create animated models that look pixelated.
-
Bake Texture Size - Size of texture to use for animation textures.
- Smallest Common - Uses the smallest most common texture size possible.
- Largest Common - Uses the largest texture calculated by vertex count * frame count.
- Most Common - Evaluates all animations and chooses the most common calculated texture size.
- Other - Manually specify the texture size for animation textures.
-
Bake Texture Quality
- 8 Bit - Low - If animations are viewed from far away, this can be used for smaller texture sizes, but can cause vertex jitter.
- 16 Bit - Medium - Best for most use cases. Good quality animation when viewed both close up and far away.
- 32 Bit - High - If animations will be viewed extremely close up and have subtle movements, this mode may be needed.
-
Level of Detail (LOD)
- LOD levels can be used to reduce CPU overhead by updating the mesh less often when farther away. Specify a distance and frame rate to playback the animation.
Bake Animations
Once the settings are correct, click Bake Animations. This will create animation assets and prefabs using the specified settings.
**NOTE** - In snapshot mode, if the skinned mesh's pivot is not facing Y up, it's rotation may appear off until playback begins. This is because all weight information is lost during baking.
Generated Assets
Once baking is complete, the following assets will be created.
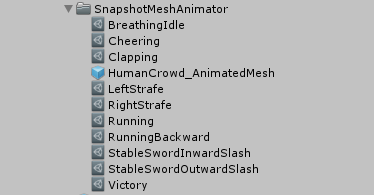
Each animation will get a MeshAnimation asset and a MeshAnimator prefab will be created. Rebaking the same asset will update existing MeshAnimation files and create a new prefab, so it's good practice not to use the generated prefab as the main asset, but rather a child of a top level prefab.
MeshAnimation
The Mesh Animation is the asset that stores the animation info. In shader mode, textures will be sub-assets of the main MeshAnimation asset.
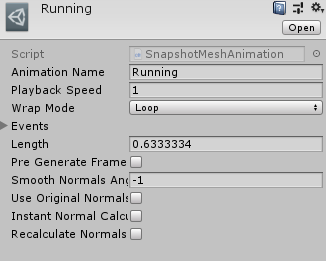
- Playback Speed - The speed the animation will play. Changing this will change the speed for all meshes using this animation. To affect a certain mesh, set the speed variable on that object's MeshAnimator.
- Wrap Mode - See WrapMode.
- Events - Animation events. These will be fired when a particular frame is played. These function just like Unity Animation Events. See Using Animation Events and AnimationEvent.
- Snapshot Mode Only Pre Generate Frames - All animation frames will be generated when the object is instantiated. Useful for spawning the objects during a loading screen.
- Snapshot Mode Only Use Original Normals - The original mesh normals will be used for each frame instead of recalculating.
- Snapshot Mode Only Instant Normal Calculation - For higher performance, normals are generated in a background thread. When enabled, they will be calculated on the main thread instantly.
- Snapshot Mode Only Recalculate Normals on Rotation - When a mesh transform rotates, force normal recalculation.
Mesh Animator
The Mesh Animator is the main script that animates and swaps frames during gameplay. It functions similarly to the legacy Animation component.
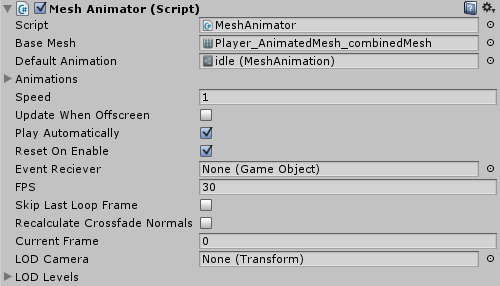
- Base Mesh - The mesh used to generate frames.
- Default Animation - The animation played if Play Automatically is true.
- Animations - The array of animations.
- Speed - Playback speed of the animator.
- Update When Offscreen - The animator will pause while the character is offscreen, saving performance.
- Play Automatically - Animation will begin playing automatically.
- Reset On Enable - If the script is disabled and re-enabled, the animation will start from the beginning.
- Event Reciever - The object that will recieve AnimationEvents.
- FPS - The frames per second the animations were baked at, used internally for playback speed.
- Skip Last Loop Frame - This will skip displaying the last frame of animation for looping animations.
- Current Frame - Displays the current frame of animation displayed.
- LOD Camera - The camera used for determining distance for LOD's. If none is specified, Camera.main will be used.
- Snapshot Mode Only Sync Crossfade Mesh Count - By default, crossfade meshes aren't destroyed until all Mesh Animator instances are. Turning this on destroys them as soon as an instance is destroyed.
- Snapshot Mode Only Recalculate Crossfade Normals - Calls RecalculateNormals() on meshes generated for in-between frames during a crossfade.
Using Mesh Animator
Mesh Animator functions much like the legacy Animation component. In it's simplest form, animations are played by calling the Play() method.
public MeshAnimatorBase meshAnimator;
void Start()
{
    meshAnimator.Play("idle");
}
The Mesh Animator component has a few callbacks that can be used.
public MeshAnimatorBase meshAnimator;
void Start()
{
    // called when an animation completes
    meshAnimator.OnAnimationFinished += (anim) =>
    {
        Debug.Log(anim + " finished.");
    };
    // called when a new frame of animation is displayed
    meshAnimator.OnFrameUpdated += () =>
    {
        Debug.Log("Animation frame changed.");
    };
    // called when a MeshAnimator enters or leaves the screen
    meshAnimator.OnVisibilityChanged += (isVisible) =>
    {
        Debug.Log(isVisible);
    };
}
Controlling Mesh Animator with Mecanim
With the convience of Mecanim's state machines, included is an example MecanimMeshAnimatorController.cs script. This script looks at the current state of a Mecanim animator, and plays the appropriate animation on the Mesh Animator. State names MUST match the name of the MeshAnimation and blend trees are not supported.
Example State Machine
Since running an animator with it's own controller when not needed is excessive and hurts performance, included is an example state machine that achieves the same result as the Mecanim controller but more efficiently.
using UnityEngine;
using System.Collections;

public class AnimatorStateMachine : MonoBehaviour
{
    public MeshAnimatorBase meshAnimator;
    public bool crossFade = false;
    void Start()
    {
        meshAnimator.Play();
        meshAnimator.OnAnimationFinished += OnAnimationFinished;
    }
    void OnAnimationFinished(string anim)
    {
        string newAnim = string.Empty;
        switch (anim)
        {
            case "idle":
                newAnim = "run_forward";
                break;
            case "run_forward":
                newAnim = "run_backward";
                break;
            case "run_backward":
                newAnim = "run_left";
                break;
            case "run_left":
                newAnim = "run_right";
                break;
            case "run_right":
                newAnim = "idle";
                break;
        }
        if (crossFade)
            meshAnimator.Crossfade(newAnim);
        else
            meshAnimator.Play(newAnim);
    }
}
Memory Implications
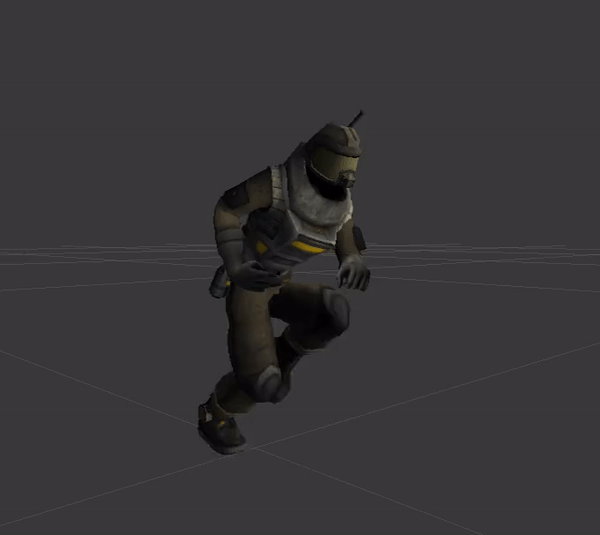
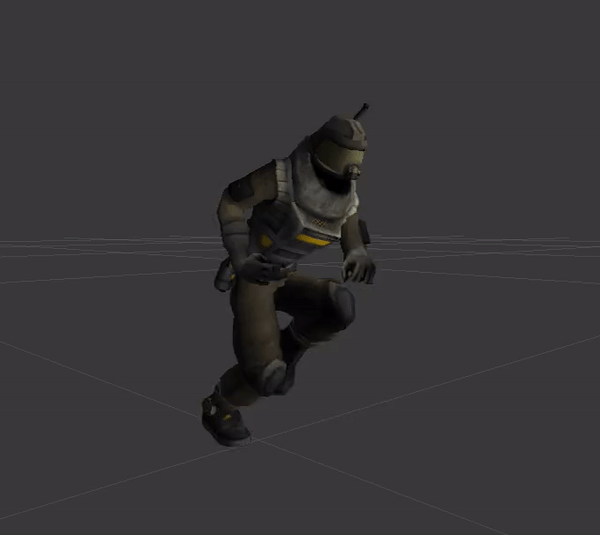
Snapshot Mode OnlyWith Mesh Animator, depending on the number of vertices, and number of frames in the animation, it is going to take up more memory than a traditional SkinnedMeshRenderer and Animator. However, the performance gains occur on the CPU. Finding a good balance between the two is important. If a character has 5k vertices and 20 animations each a few seconds long, it's not practical to use Snapshot mode.
The best use of Mesh Animator is with low-polygon models with short animations. Each frame of animation is generated and copied from the base, which is why so much memory is needed for larger meshes and longer animations.
A 4k triangle character (like in the example) takes up 500KB of memory. To display a 1 second idle animation baked at 30fps, the system would need approximately 15MB of memory. Memory usage is the same whether displaying 1 character or 1000 characters. A character that has only 400 triangles takes 32KB of memory per mesh, so the same length animation would only take 960KB of memory. Use this information to plan accordingly in the project.
Crossfading animations requires a temporary mesh to be created for the interpolation and adds a little CPU overhead for interpolating the vertex positions. This overhead grows larger the more vertices the mesh has. The temporary meshes are pooled automatically so that Mesh Animators sharing the same base mesh can use it. Crossfading a mesh requires at least 1 extra copy of the base mesh.
Shader Mode
Shader mode uses animation textures to display animation on a mesh. In order to accomplish this and support GPU instancing, custom shaders are needed.
Custom Shaders
Included in the asset package are the most commonly used built-in shader provided by Unity, converted to work with Mesh Animator. These include:
- Standard Shader
- Legacy Shaders - Diffuse
- Mobile - Diffuse
- Mobile - Normal Diffuse
- Mobile - Bump Specular
- Mobile - Unlit Alpha
- Mobile - Unlit Alpha Test
- Mobile - Unlit Color
- Mobile - Unlit Texture
- Universal Render Pipeline - Unlit
- Universal Render Pipeline - Simple Lit
- Universal Render Pipeline - Lit
Implementing Custom Shaders
If wanting to convert existing shaders to use with Mesh Animator, the process to convert is relatively easy for both fragment and surface shaders.
-
First, add the following properties to the shader:
Shader "Mesh Animator/My Custom Shader" { Properties { // OTHER PROPERTIES HERE // start MeshAnimator [PerRendererData] _AnimTimeInfo ("Animation Time Info", Vector) = (0.0, 0.0, 0.0, 0.0) [PerRendererData] _AnimTextures ("Animation Textures", 2DArray) = "" {} [PerRendererData] _AnimTextureIndex ("Animation Texture Index", float) = -1.0 [PerRendererData] _AnimInfo ("Animation Info", Vector) = (0.0, 0.0, 0.0, 0.0) [PerRendererData] _AnimScalar ("Animation Scalar", Vector) = (1.0, 1.0, 1.0, 0.0) [PerRendererData] _CrossfadeAnimTextureIndex ("Crossfade Texture Index", float) = -1.0 [PerRendererData] _CrossfadeAnimInfo ("Crossfade Animation Info", Vector) = (0.0, 0.0, 0.0, 0.0) [PerRendererData] _CrossfadeAnimScalar ("Crossfade Animation Scalar", Vector) = (1.0, 1.0, 1.0, 0.0) [PerRendererData] _CrossfadeStartTime ("Crossfade Start Time", float) = -1.0 [PerRendererData] _CrossfadeEndTime ("Crossfade End Time", float) = -1.0 // end MeshAnimator } -
If shadow support is needed, add "addshadow" to the end of the surface or fragment pragma statement like below:
#pragma surface surf Lambert noforwardadd addshadow
or
#pragma fragment frag addshadow
-
Support GPU instancing. Adding this will show the "Enable GPU Instancing" checkbox on the material and batch meshes together into a single draw call.
#pragma multi_compile_instancing
-
If a vertex function does not already exist in the shader, add the following for basic support:
Alternatively, use one of the provided shaders as a starting point to help convert the shader.// start MeshAnimator #include "MeshAnimator.cginc" #pragma vertex vert struct appdata_ma { float4 vertex : POSITION; float2 texcoord : TEXCOORD0; uint vertexId : SV_VertexID; UNITY_VERTEX_INPUT_INSTANCE_ID }; v2f vert (appdata_ma v) { v2f o; UNITY_SETUP_INSTANCE_ID(v); UNITY_INITIALIZE_VERTEX_OUTPUT_STEREO(o); o.vertex = UnityObjectToClipPos(ApplyMeshAnimation(v.vertex, v.vertexId)); o.texcoord = TRANSFORM_TEX(v.texcoord, _MainTex); UNITY_TRANSFER_DEPTH(v); UNITY_TRANSFER_FOG(o, o.vertex); return o; } // end MeshAnimator -
The key lines above if a vertex function already exists are as follows:
-
#include "MeshAnimator.cginc"
Include the MeshAnimator shader code. This path is relative to the location of the shader. By default it's located in the MeshAnimator/Shaders folder. -
uint vertexId : SV_VertexID;
Provides the function with a vertex index of the mesh. -
Surface shaders:
o.vertex = ApplyMeshAnimation(v.vertex, v.vertexId);
Fragment shaders:o.vertex = UnityObjectToClipPos(ApplyMeshAnimation(v.vertex, v.vertexId));
This will move the vertex using the properties provided by MeshAnimator.
-
- By this point the shader should start responding to the input from the Mesh Animator component. If having issues converting a shader, feel free to reach out for support.
URP - Universal Render Pipeline
Shader Mode ONLY No special action is required for URP to work with Mesh Animator in Snapshot mode.
Included with the asset are converted versions of the default Universal Render Pipeline shaders. They include:
- Mesh Animator / Universal Render Pipeline / Unlit
- Mesh Animator / Universal Render Pipeline / Lit
- Mesh Animator / Universal Render Pipeline / Simple Lit
Set mesh materials to use these shader versions when using Shader mode. They can be found under the Mesh Animator/Universal Render Pipeline/... shader directory.
HDRP - High Definition Render Pipeline
Shader Mode ONLY No special action is required for HDRP to work with Mesh Animator in Snapshot mode.
HDRP shaders have not yet been converted. This is a WIP and will be released as soon as it's ready.
Shader Graph
Shader Mode ONLY No special action is required for URP and HDRP to work with Mesh Animator in Snapshot mode.
Disclaimer: Shader graphs do not support instanced properties. GPU instancing will not occur when using these shader alongside Mesh Animator.
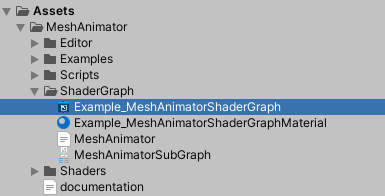
Included in the MeshAnimator/ShaderGraph folder is a sub graph and example shader that can be used to implement Mesh Animator into shader graphs.
Please follow the below steps to add the Mesh Animator Sub Graph.
- Bake the asset with the "Support Shader Graph" setting enabled.
- Currently accessing vertex id is not supported by shader graphs. To use this required information, the vertex id is stored in the X channel of the mesh UV4 vertex information.

-
If not already created, create a new shader graph shader.

-
Open the included example shader.
-
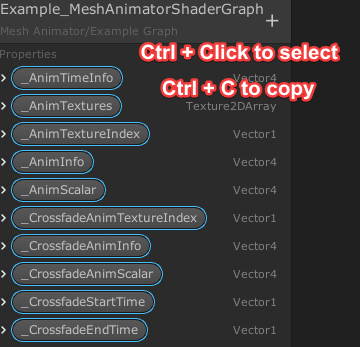
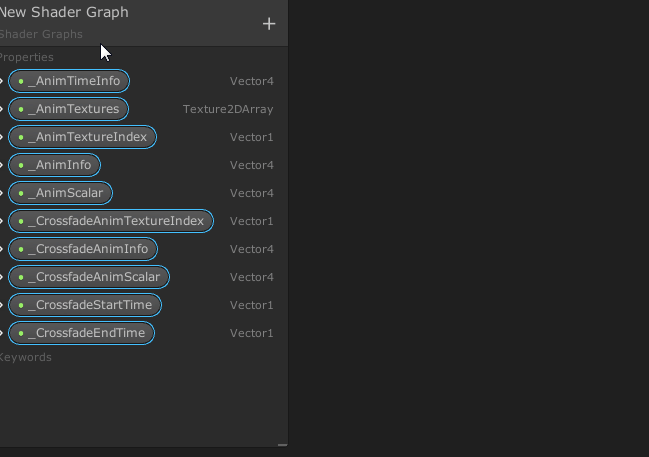
Copy the required Mesh Animator properties, or manually create them in the new shader.
- _AnimTimeInfo - Vector4
- _AnimTextures - Texture2DArray
- _AnimTextureIndex - Vector1
- _AnimInfo - Vector4
- _AnimScalar - Vector4
- _CrossfadeAnimTextureIndex - Vector1
- _CrossfadeAnimInfo - Vector4
- _CrossfadeAnimScalar - Vector4
- _CrossfadeStartTime - Vector1
- _CrossfadeEndTime - Vector1
-
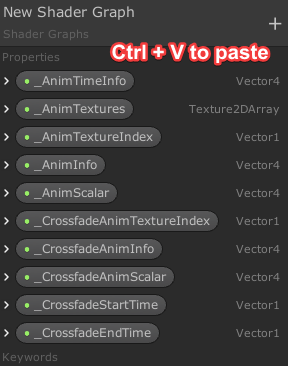
Paste the properties into the new shader graph.
-
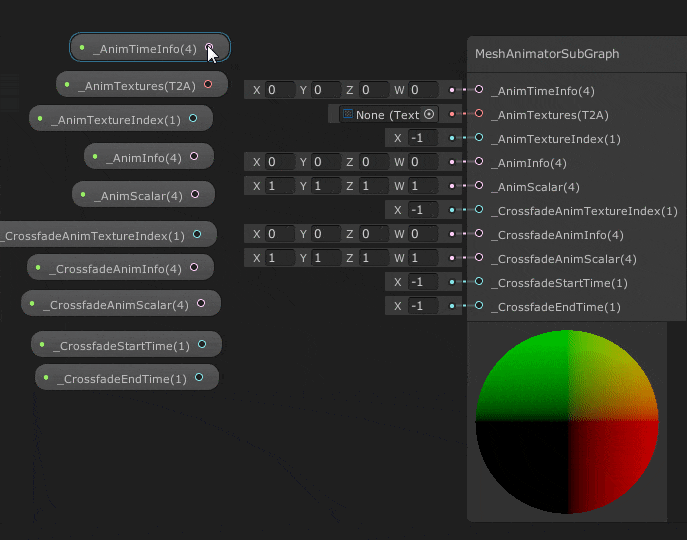
Create a new MeshAnimatorSubGraph node.
-
Drag the properties into the graph.
-
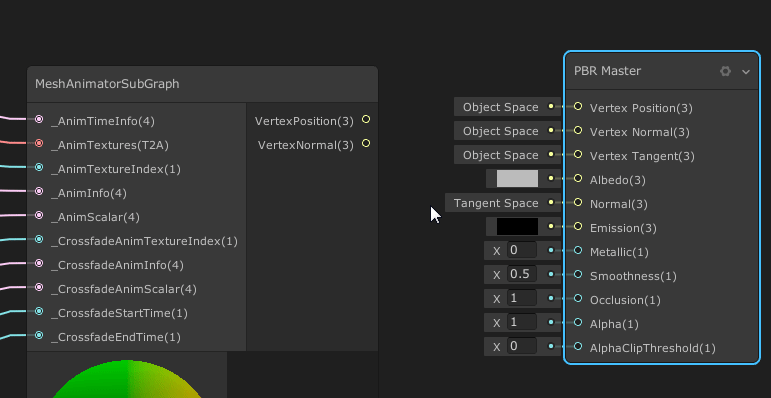
Link the properties to the corresponding slot in the MeshAnimatorSubGraph.
-
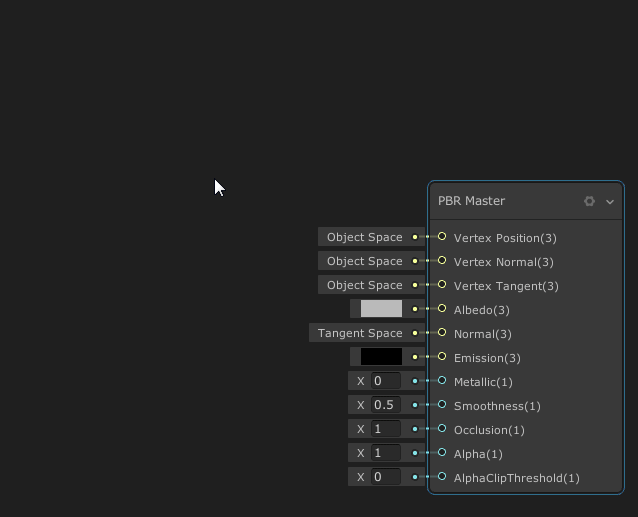
Connect the VertexPosition and VertexNormal outputs to the corresponding inputs in the master node.
-
Create a material using the shader, and assign it the Mesh Animator baked prefab!
Mesh Animator Code Reference
All Mesh Animator scripts reside in the FSG.MeshAnimator namespace.
Implement as follows:
using FSG.MeshAnimator;
Variables
// The mesh that will be animated
public Mesh baseMesh;

// The default animation that will be played if playAutomatically = true
public MeshAnimation defaultAnimation;

// Array of animations on the animator
public MeshAnimation[] animations;

// Playback speed of the animator
public float speed;

// Continue playing animation when the animator is off screen
public bool updateWhenOffscreen;

// Should animation begin playing when the animator is enabled
public bool playAutomatically;

// Reset the animator OnEnable and play the default animation
public bool resetOnEnable;

// The target object to recieve AnimationEvents
public GameObject eventReciever;

// Get the current animation playing
public MeshAnimation currentAnimation { get; }

// The FPS the animations were baked at
public int FPS;

// Callback for when an animation has finished playing
public Action OnAnimationFinished;

// Callback for when the mesh has changed frames
public Action OnFrameUpdated;

// Callback for when the object has entered or left the viewable screen
public Action OnVisibilityChanged;
Public Methods
// Crossfade an animation by index
public void Crossfade(int index, float speed = 0.1f);
meshAnimator.Crossfade(0, 0.25f);

// Crossfade an animation by name
public void Crossfade(string anim, float speed = 0.1f);
meshAnimator.Crossfade("idle", 0.25f);

// Play the default animation, or resume playing a paused animator
public void Play();
meshAnimator.Play();

// Play an animation by name
public void Play(string anim);
meshAnimator.Play("idle");

// Play an animation by index
public void Play(int index);
meshAnimator.Play(0);

// Play a random animation
public void PlayRandom(params string[] anim);
meshAnimator.Play("idle", "idle_bored", "dance", "sit");

// Play an animation after the previous one has finished
public void PlayQueued(string anim);
meshAnimator.Play("wave");
meshAnimator.PlayQueued("idle");

// Pause an animator, disabling the component also has the same effect
public void Pause();
meshAnimator.Pause();

// Restart the current animation from the beginning
public void RestartAnim();
meshAnimator.RestartAnim();

// Get the MeshAnimation by name
public MeshAnimation GetClip(string clipname);
MeshAnimation clip = meshAnimator.GetClip("idle");